
How To Install Timber Wall Panelling: A Step-by-Step Guide
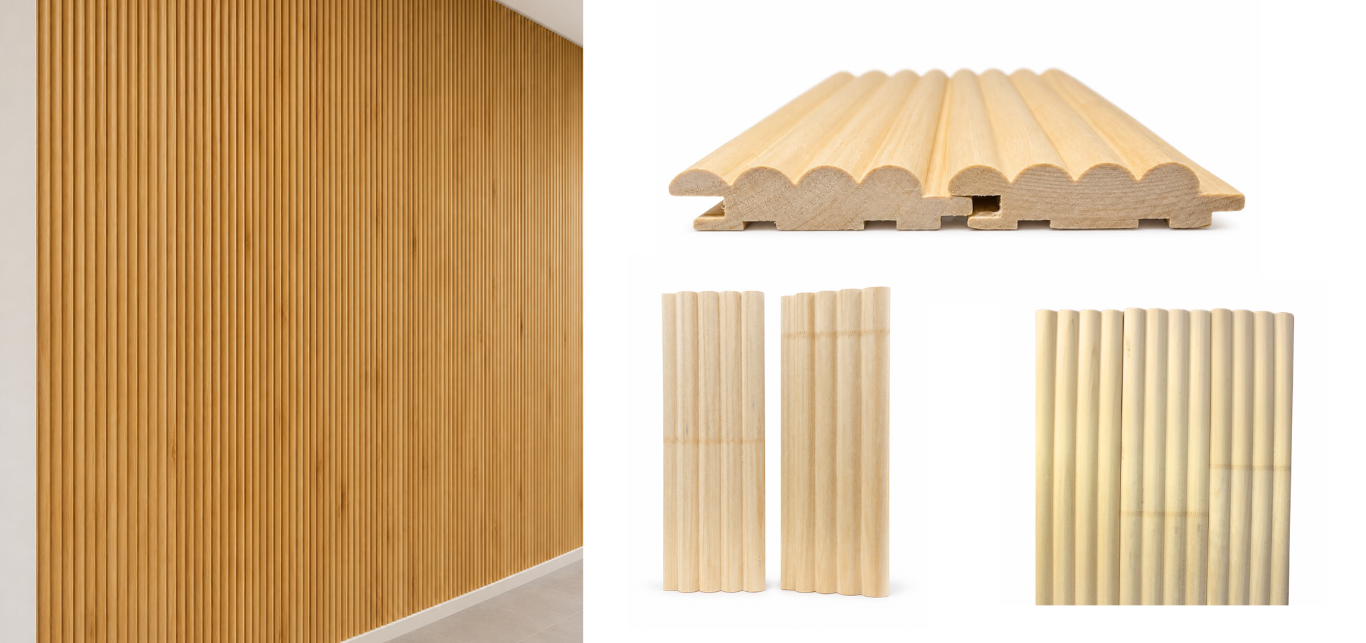
How To Install Timber Wall Panelling: A Step-by-Step Guide
Timber wall panelling is a great way to add warmth, texture, and character to a space, whether you're covering an entire wall or adding panelling below a benchtop or along a half wall.
While installing timber panelling is achievable for a DIYer, preparation is key. You'll need the right tools, a dedicated workspace and plenty of patience to achieve a professional-looking result. Taking the time to check that your walls are level and square, properly sand your panels and double-check your cuts will make all the difference.
Before getting started, make sure you have everything you need and allow enough time to complete the installation properly.
If you're in the midst of planning a project and want to understand the costs involved, see our article Are Wall Panels Expensive? The Real Cost of Installing Timber Wall Panelling, email our team or visit our showroom for more information.
 A PDF version of this guide can be downloaded here: Step-by-step guide to installing timber wall panelling
Disclaimer: These instructions should be used as a guide only & may need to be modified depending on your individual use & situation.
What tools are required to install timber wall panelling
-
Measuring tape
-
Pencil
-
Table saw or circular saw
-
Sandpaper or orbital sander
-
Spirit level (laser level recommended if available)
-
Timber adhesive (type will vary depending on timber species)
-
Brad nail gun and brad nails
-
Mitre saw (for accurate crosscuts)
-
Caulking gun (if using cartridge adhesive)
-
Safety glasses and hearing protection
-
Timber filler
Installing timber wall panelling: A step-by-step guide
Step 1: Measure the wall.
Measure the height and width of your wall. Then, use these measurements to calculate how many lineal metres you'll need, allowing an additional 10–20% for wastage.
If you're unsure how to calculate your requirements, use the wall panelling calculator below.
Please note: Our calculator is designed specifically for our own wall panelling range, which has a 75mm cover width per panel.
Wall Panelling Calculator
Before ordering your panels, you should consider whether you want the panelling to sit on top of your existing skirting board or run behind it. Most installations sit on top of the skirting board, as removing it isn't always practical and can leave small gaps when using rounded or pointed panel profiles. However, removing the skirting and reinstalling it over the panelling can create a cleaner finish (particularly with square profiles, such as our Forest range).
Step 2: Prepare and Cut Your Panels
Before cutting or installing your panels, allow the timber to acclimatise to the room. We recommend leaving the panels in the installation area for 2–3 days before trimming.
Once acclimatised, measure and cut your panels to the required height and width. Most installations will require trimming the panels to length, and potentially ripping one or two panels to width, unless your wall dimensions are an exact multiple of the panel width.
Use a sharp saw blade and cut slowly to avoid damaging the ends of your panels. This is particularly important when working with engineered wood products, such as Crafted Hardwoods Blackbutt, Spotted Gum or White Gum, which can be prone to splintering.
As you work, sand any rough or sharp edges and fill any gaps or imperfections in the material, as this is much easier to do while the panels are lying flat.
Step 3: Prepare Your Wall
Timber wall panelling should not be installed over wet or drying paint. Make sure the wall is completely dry before beginning installation.
If installing onto an existing wall, remove any loose or flaking paint, fill any large holes or imperfections and sand back high spots to create a reasonably smooth, flat surface.
If your wall is particularly uneven, consider fixing timber battens to the wall first.
Battens will also be required when installing onto brick walls or walls with metal studs, as the panels need a suitable fixing point for the brad nails.
Step 4: Locate and Mark Studs
Use a stud finder to locate the vertical and horizontal timber studs behind your plasterboard wall.
Mark the position of each stud with a pencil, using a spirit level to extend the markings along the wall. This will help you identify suitable fixing points when securing your panels.
If you've installed timber battens in Step 3, you can use these as your fixing points instead.
Step 5: Install Your First Panel
There are several ways to install timber wall panelling. However, we recommend a combination of mechanical and adhesive fixing for a secure installation.
Mechanical fixing involves attaching the boards to the wall using nails or screws, positioned through the approximately 10mm flat section before the tongue.

When mechanically fixing, it is important to position the fastener through the flat section of the joint that sits flush against the wall. This prevents damage to the tongue and groove connection and allows the next panel to slot into place correctly.
To prevent splitting, you may wish to pre-drill a pilot hole before nailing.
Ensure the nail head is below the surface of the joint so they don't interfere with the adjoining panel during installation. The overhang on the groove side will conceal the brad fixing.
The type of adhesive required will depend on the timber species and the surface you're fixing to. For example, hardwoods such as Spotted Gum and Blackbutt may require a different adhesive to softwoods like Pine. If you’re unsure which product to use, we recommend speaking with your local hardware supplier.
Installing Your First Panel
Before applying adhesive, check that your starting wall edge is square. If it isn't, mark a straight reference line with a pencil and use this as your starting point. Depending on the size of any resulting gaps, quarter round or quarter dowel may be required to cover the exposed edge.
Once you're happy with your starting position, apply adhesive to the back of the panel in a zigzag pattern, then position the panel against the wall, ensuring it aligns with your reference line.
Press down firmly.
Use brad nails to hold the first panel in position while the adhesive cures.
Step 6: Install the Remaining Panels

Apply adhesive to the back of each panel and slot it into the previous panel using the tongue and groove joint. Repeat the fixing process outlined in Step 5, ensuring each panel is firmly secured while the adhesive cures.
Brad nails may not be required for every panel, as the tongue and groove joints help hold the boards together during installation. As a general guide, using brad nails every 3–4 panels should be sufficient.
However, this will depend on the adhesive being used and how well the panels are adhering to the wall. If you notice boards lifting or pulling away from the surface, additional nails may be required.
Check that your panels remain plumb and level every few boards as you work, as small alignment errors can quickly compound across the wall.
Continue installing panels until you reach the end of the wall. If any panels need to be ripped down to fit the remaining space, this should have been completed earlier in Step 2.
Step 7: Allow to Dry, Sand and Finish
 Allow the adhesive to cure according to the manufacturer's instructions before removing any brad nails or supports.
Once the adhesive has cured, fill any visible gaps, nail holes or imperfections with a matching timber filler. Sand the wall until smooth before applying your chosen finish.
Note: If using our Engineered Wood Products (See our blog article What is EWP/Engineered Wood Product for more information), we do not recommend an oil-based finish as these products can be prone to splintering. Instead, we recommend using a suitable film-forming finish, such as lacquer or a clear protective coating.